All in One View
Content from Python Scripts and Modules
Last updated on 2026-06-16 | Edit this page
Estimated time: 22 minutes
Overview
Questions
- What is a ‘module’ in Python? How does this differ from a ‘script’?
- What are the benefits of modularising our Python code?
Objectives
- Introduce the example library used in this lesson.
- Understand the limitations of scripts.
- Understand what happens when we
importsomething. - Learn how to convert a simple script into a reusable module.
Python as a Scripting Language
Python is frequently used as a scripting language by scientists and engineers due to its expressiveness, simplicity, and its rich ecosystem of third-party libraries. There isn’t a hard line between a scripting language and a non-scripting language, but some differences include:
- Scripts are not compiled to an executable or library object (such as
.soor.dll) before use, and are instead interpreted directly from the source code. A non-scripting language, such as C++, must be compiled to machine code before it can be used. - Scripts must be run using some other compiled program, such as
pythonorbash. - Scripts are typically short programs that leverage the power of complex libraries to accomplish some task. They focus more on gluing together existing tools than performing their own low-level computations.
Python is a very general-purpose language, and it meets the criteria of both a scripting language and a non-scripting language depending on how we choose to use it:
- Python can be run as an interactive session simply by calling
pythonat the command line. This is typical of a scripting language. - It is possible to write a linear series of Python expressions in a file, and run this using the Python interpretter –again, like a scripting language.
- Python code can be bundled in modules and packages
which can then be
import-ed into other Python programs/scripts. These are typically pre-compiled into ‘bytecode’ to improve performance. This is closer to the behaviour of a fully compiled language.
Typically, a Python project will begin as something that is inarguably a ‘script’, but as it develops it will take on the character of a ‘program’. A single file containing a linear series of commands may develop into a module of reusable functions, and this may develop further into a package of related modules. Developing our software in this way allows our programs to grow in complexity in a much more sustainable manner, and grants much more flexibility to how users can interact with our code.
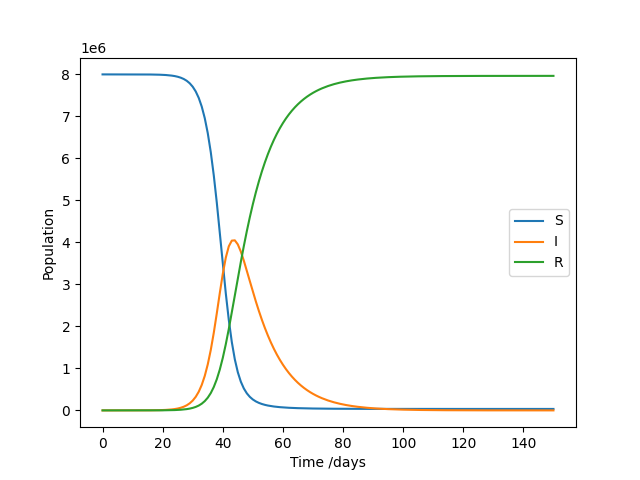
Throughout this course, we’ll develop an example library that might be used for epidemiology modelling, though it isn’t necessary to understand how this works in order to follow the course. We’ll begin where many new Python projects start: with a simple script. This one solves a SIR model, which models the number of Susceptible, Infected, and Recovered individuals as a pathogen spreads through a population. The general pattern of the code – set up inputs, solve a problem, plot the results – should be familiar to those working in a data-oriented field. It uses the popular plotting library Matplotlib to generate a figure.
It isn’t necessary to dwell on the details of the script. It’s only being used as an example of the sort of script the students might be familiar with.
PYTHON
import matplotlib.pyplot as plt

# Inputs
# Total number of susceptible people at the start of an outbreak
pop_size = 8000000
# Average no. of new infections per infected person per day
beta = 0.5
# Inverse of the average number of days taken to recover
gamma = 0.1
# Number of days to run the simulation for
days = 150
# Number of infected people at the start of the simulation
I_0 = 10

# Initialise data
S = [] # Number of susceptible people each day
I = [] # Number of infected people each day
R = [] # Number of recovered people each day
S.append(pop_size - I_0)
I.append(I_0)
R.append(0)

# Solve model
for i in range(days):
    # Get rate of change of S, I, and R
    dS = - beta * S[i] * I[i] / pop_size
    dR = gamma * I[i]
    dI = -(dS + dR)
    # Get values on next day
    S.append(S[i] + dS)
    I.append(I[i] + dI)
    R.append(R[i] + dR)

# Plot results
plt.plot(range(len(S)), S, label="S")
plt.plot(range(len(I)), I, label="I")
plt.plot(range(len(R)), R, label="R")
plt.xlabel("Time /days")
plt.ylabel("Population")
plt.legend()
plt.show()
If we save this script to the file SIR_model_script.py,
it can then be run from the command line as follows:
If everything works as expected, it should produce the following result:
So far so good, but there are some limitations to this coding style.
Challenge
Can you think of any drawbacks to writing scripts like the one shown above? Think about the general structure of the code and how the user interacts with it rather than the details of the implementation.
There are many possible answers to this. Here are some examples:
- If the user wants to change the model inputs, they have to open the script file and modify some lines of code before running again. This is difficult to automate and it’s possible that the user might overwrite something they didn’t intend to.
- If we wish to expand on this functionality or do something different with the output data, we must either overwrite our original script, or copy the code across to a new scipt. If we choose to copy the script, it would take a lot of effort to update all versions every time we wish to adjust the core routine, and this is likely to introduce bugs.
- The user must know where the script is stored on their system, navigate to that directory, and call it from there. This makes it challenging to string scripts together to make more complex programs.
It’s important to note that there’s nothing strictly wrong
with writing scripts in this way, and it’s often a good starting point
for a new project. However, as we develop our project further, we might
find it useful to bundle up the reusable bits of our code into a
module that we can import from other Python
programs, just as we import-ed Matplotlib in our own
script.
What is a ‘Module’?
A module is simply any file containing Python statements,
so, technically, the script we defined above is already a module. The
name of a module is the same as the file name, only without the
.py extension. If we were to open a new Python interpretter
session and call the following:
then the script would run as if we’d run it from the command line.
However, the variables we defined in the script will be accessible
within the namespace SIR_model_script:
The current namespace includes all of the objects defined in our
interpretter session, plus all built-in Python functions and types. When
we import our script, we add the name of the script to the
current namespace, but not the variables defined within it; those are
defined within the scope of SIR_model_script, and
are only accessible using the dot operator. If we wanted to bring
everything within the script to the current namespace, but not the
module itself, we can instead call:
Alternatively, if we only want a few objects brought into the current namespace, we can use:
The dangers of
from module import *
Using from module import * is considered harmful by many
developers, as objects can be unintentionally overwritten if there are
any name clashes between modules. It can also make it difficult for
people reading you code to tell which modules your functions and classes
have come from. In general, it’s better to be explicit about what you’re
import-ing.
It is also possible to assign an alias to a module name using the
as keyword:
Something to note about import is that it runs the code
found within the module only the first time it is imported, so if we
were to import our script multiple times, it would only create a plot
once.
While we’ve shown that our script is importable, so far it doesn’t seem to provide many advantages over simply running it on the command line. The next section will explain what features can make a module more versatile and useful.
The result is 15, as the second import does not run the
code in my_module.py, and therefore
my_module.x is not reset back to 10.
Making a Reusable Module
A good Python module will tend to do the following:
- Define functions, classes and constants that the user might want to use.
- Not rely on global variables (those defined within the module but not inside of functions/classes), except in a few scenarios where it only makes sense for a single instance of the an object to exist.
- Avoid performing runtime calculations at the
importstage.
Most Python modules shouldn’t do anything if we try to run them from
the command line, and instead they should provide
import-able tools that can be used in the Python
interpretter, by other Python modules, or by dedicated scripts. We’ll
see later how to write a reusable Python module that doubles as a
runnable script.
Most scripts can be converted into reusable modules using the following steps:
- Identify each major stage of our data processing. Examples may include reading in data, running a model, processing results, creating plots, etc.
- For each stage, identify what data is an input, and what is an output.
- Bundle each processing stage into a function that takes the input data as arguments and returns the output data.
For example, the script SIR_model_script has two stages
that can be bundled into functions. The first stage runs the SIR model,
and it takes the following input parameters:
| Parameter | Type | Description |
|---|---|---|
pop_size |
int |
Total number of susceptible people at the start of an outbreak |
beta |
float |
Average no. of new infections per infected person per day |
gamma |
float |
Inverse of the average number of days taken to recover |
days |
int |
Number of days to run the simulation for |
I_0 |
int |
Number of infected people at the start of the simulation |
The output data from this stage is:
| Parameter | Type | Description |
|---|---|---|
S |
List[float] |
Number of susceptible people each day |
I |
List[float] |
Number of infected people each day |
R |
List[float] |
Number of recovered people each day |
We can therefore bundle this portion of the script into the function
SIR_model:
PYTHON
def SIR_model(pop_size, beta, gamma, days, I_0):
    """
    Solves a SIR model numerically using a simple integration scheme.

    Parameters
    ----------
    pop_size: int
        Total number of susceptible people at the start of an outbreak.
    beta: float
        Average number of new infections per infected person per day.
    gamma: float
        Inverse of the average number of days taken to recover.
    days: int
        Number of days to run the simulation for.
    I_0: int
        Number of infected people at the start of the simulation.

    Returns
    -------
    S: List[float]
        Number of susceptible people on each day.
    I: List[float]
        Number of infected people on each day.
    R: List[float]
        Number of recovered people on each day.
    """
    # Initialise data
    S = [] # Number of susceptible people each day
    I = [] # Number of infected people each day
    R = [] # Number of recovered people each day
    S.append(pop_size - I_0)
    I.append(I_0)
    R.append(0)

    # Solve model
    for i in range(days):
        # Get rate of change of S, I, and R
        dS = - beta * S[i] * I[i] / pop_size
        dR = gamma * I[i]
        dI = -(dS + dR)
        # Get values on next day
        S.append(S[i] + dS)
        I.append(I[i] + dI)
        R.append(R[i] + dR)

    return S, I, R
Note that we’ve provided a nice docstring, so that users of our function can understand how to use it. The second stage of our script takes the results of the SIR model as input data, and produces a plot. We can therefore bundle the plotting parts of the script as follows:
PYTHON
# Note: imports should go at the top of the file
import matplotlib.pyplot as plt

def plot_SIR_model(S, I, R):
    """
    Plot the results of a SIR simulation.

    Parameters
    ----------
    S: List[float]
        Number of susceptible people on each day.
    I: List[float]
        Number of infected people on each day.
    R: List[float]
        Number of recovered people on each day.

    Returns
    -------
    None
    """
    plt.plot(range(len(S)), S, label="S")
    plt.plot(range(len(I)), I, label="I")
    plt.plot(range(len(R)), R, label="R")
    plt.xlabel("Time /days")
    plt.ylabel("Population")
    plt.legend()
    plt.show()
If we save the two code blocks above to a file called
SIR_model.py, we can then open up a Python interpreter and
run the following:
PYTHON
>>> from SIR_model import SIR_model, plot_SIR_model
>>> S, I, R = SIR_model(
        pop_size=8000000, beta=0.5, gamma=0.1, days=150, I_0=10
    )
>>> plot_SIR_model(S, I, R)
This should give us the same results as when we ran the script
earlier, and we can run the SIR_model function with
different inputs without needing to change the input parameters in the
file itself. The functions in our script are now therefore ‘reusable’,
and can be integrated in other workflows. The nice docstrings we added
can be viewed using the built-in help() function:
However, the script-like behaviour has been lost:
In the next section, we’ll show how to maintain script-like behaviour, and write reusable modules in the same file.
Maintaining Script-Like Functionality
If we wish, we can also maintain the script-like behaviour using the
if __name__ == "__main__".py idiom at the bottom of the
file SIR_model.py. Here, we create a special
if block at the bottom of our module, and within this we
call each of our functions in turn, using the outputs of one as inputs
to the next:
PYTHON
# file: SIR_model.py

# Add this after our function definitions
if __name__ == "__main__":
    S, I, R = SIR_model(
        pop_size=8000000, beta=0.5, gamma=0.1, days=150, I_0=10
    )
    plot_SIR_model(S, I, R)
With this is place, we can still run the module as if it were a script:
However, this section will not run if we import the
file. Let’s break down how this works:
- Each Python module is automatically assigned a variable
__name__, and this is usually set to the name of the file without the.pyextension.
OUTPUT
"SIR_model"- The exception to the rule is when we run a Python module as a
script. In this case, the top-level file instead has its
__name__variable set to"__main__".
Therefore, the code written under
if __name__ == "__main__" will run if we use the module as
a script, but not if we import the file.
It prints "__main__"
It prints "name_test"
As we’ll see later, it can also be handy to bundle the contents of
our if __name__ == "__main__" block into a function, as
then we can import that function and access our script-like
behaviour in another way. This function can take any name, but is often
called main:
PYTHON
# file: SIR_model.py

def main():
    S, I, R = SIR_model(
        pop_size=8000000, beta=0.5, gamma=0.1, days=150, I_0=10
    )
    plot_SIR_model(S, I, R)

if __name__ == "__main__":
    main()
We’ll use this format later when discussing ways to make runnable packages.
Managing PYTHONPATH
Our script is now import-able, so the
SIR_model function can be used from any other Python
script, module, or interpretter session. However, we still need to know
where the module is stored on our file system, which can make it
difficult to reuse the functions in a separate project. A simple
solution is to set the PYTHONPATH environment variable on
our system. On Linux machines, this can be achieved using:
TODO: Add an example here where we change dir and then try to import a module. This will fail without setting python path.
If you want this to be set every time you open a terminal, you can
add the line to the file ~/.bashrc.
However, this is not recommended as a long-term solution, as a custom
PYTHONPATH can cause dependency conflicts between different
packages on our system and can be difficult to debug. In a later
chapter, we will show how to install our own modules using the
pip package manager, which gives us much more control over
how we integrate our modules into our Python environments (which may be
managed using tools such as venv or conda),
and also allows us to install packages from a remote repository. We’ll
also show how to upload our own packages to the remote repository PyPI,
and therefore allow others to download and install our code from the
command line!
Extra: Better Automation with Matplotlib
Earlier, we converted the plotting section of our script into a function that the user can call. There are two issues with the implementation as it stands:
- The use of
plt.show()interrupts the flow of the program and requires the user to manually save the figure or discard it. This makes it difficult to automate the production of figures. - As it calls
plt.plot()without first creating a new figure, it may interfere with our user’s Matplotlib code.
We can improve the function with a few changes:
- Rather than using Matplotlib’s ‘implicit’ API (such as by using
plt.plot()), which manages global Matplotlib objects, use the ‘explicit’ API, sometimes called the ‘object-oriented’ API. This requires handlingFigureandAxesobjects directly. - Optionally take in an
Axesobject. This way, the user can choose to set up their ownFigureandAxes, and our function can write to it. - Return the
Axesobject that we worked on, so that the user can make further changes if they wish. - Only use
plt.show()if the user requests it. Also provide an option to save the figure.
Here is an example of an improved function:
PYTHON
import matplotlib.pyplot as plt

def plot_SIR_model(S, I, R, ax=None, save_to=None, show=False):
    """
    Plot the results of a SIR simulation.

    Parameters
    ----------
    S: List[float]
        Number of susceptible people on each day.
    I: List[float]
        Number of infected people on each day.
    R: List[float]
        Number of recovered people on each day.
    ax: Optional[plt.Axes], default None
        Axes object on which to create the plot.
        A new Axes is created if this is None.
    save_to: Optional[str], default None
        Name of the file to save the plot to.
        Does not save if None.
    show: bool, default False
        If True, call plt.show() on completion.

    Returns
    -------
    plt.Axes
        The axes object the results have been plotted to.
    """
    # Use plt.subplots to create Figure and Axes objects
    # if one is not provided.
    if ax is None:
        fig, ax = plt.subplots()

    # Create plot
    ax.plot(range(len(S)), S, label="S")
    ax.plot(range(len(I)), I, label="I")
    ax.plot(range(len(R)), R, label="R")
    ax.set_xlabel("Time /days")
    ax.set_ylabel("Population")
    ax.legend()

    # Optionally save the figure
    if save_to is not None:
        fig = ax.get_figure()
        fig.savefig(save_to)

    # Optionally show the figure
    if show:
        plt.show()

    return ax
This gives our users much more control over how to create plots, and it allows our function to be used as part of a larger automated pipeline that runs without needing human input. There are many further ways we could improve this function and allow our users to finely control what’s plotted, such as by allowing the user to overwrite axis/line labels or interact with legend placement, but we’ll move on from this topic for now.
Extra: Better scripting with argparse
TODO: split arg parsing off into a separate episode
We showed earlier how to maintain script-like functionality in our modules. We’ll update that code to include our updated plotting function, so we’ll automatically save to a file if the user runs our script:
PYTHON
# file: SIR_model.py

def main():
    S, I, R = SIR_model(
        pop_size=8000000, beta=0.5, gamma=0.1, days=150, I_0=10
    )
    plot_SIR_model(S, I, R, save_to="SIR_model.png")

if __name__ == "__main__":
    main()
An issue with our example is that it still requires the user to
manually edit the file if they wish to change the input or outputs. This
problem can be solved by instead taking arguments from the command line.
A simple interface can be created using sys.argv, which is
a list of command line arguments in the form of strings:
PYTHON
# file: SIR_model.py
import sys

def main():
    # Note: sys.argv[0] is the name of our program!
    pop_size = int(sys.argv[1])
    beta = float(sys.argv[2])
    gamma = float(sys.argv[3])
    days = int(sys.argv[4])
    I_0 = int(sys.argv[5])
    output = sys.argv[6]

    S, I, R = SIR_model(
        pop_size=pop_size,
        beta=beta,
        gamma=gamma,
        days=days,
        I_0=I_0,
    )
    plot_SIR_model(S, I, R, save_to=output)

if __name__ == "__main__":
    main()
However, this requires the user to provide every argument in order,
and doesn’t allow default arguments. We can achieve a better interface
using the built-in argparse library. The comments in the
code below explain how this works:
PYTHON
# file: SIR_model.py
from argparse import ArgumentParser

def main():
    # Create an argument parser object. We can provide
    # some info about our program here.
    parser = ArgumentParser(
        prog="SIR_model",
        description="Solves SIR model and creates a plot",
    )

    # Add each argument to the parser. We can specify
    # the types of each argument. Optional arguments
    # should have single character names with a hypen,
    # or longer names with a double dash.
    parser.add_argument(
        "-p", "--pop_size", type=int, default=10000000,
        help="Total population size",
    )
    parser.add_argument(
        "-b", "--beta", type=float, default=0.5,
        help="Average no. of new infections per infected person per day",
    )
    parser.add_argument(
        "-g", "--gamma", type=float, default=0.1,
        help="Inverse of average number of days taken to recover",
    )
    parser.add_argument(
        "-d", "--days", type=int, default=150,
        help="Number of days to run the simulation",
    )
    parser.add_argument(
        "-i", "--i0", type=int, default=10,
        help="Number of infected people at the start of the simulation",
    )
    parser.add_argument(
        "-o", "--output", default="SIR_model.png",
        help="Output file to save plot to",
    )

    # Get each argument from the command line
    args = parser.parse_args()

    # Run our code
    S, I, R = SIR_model(
        pop_size=args.pop_size,
        beta=args.beta,
        gamma=args.gamma,
        days=args.days,
        I_0=args.i0,
    )
    plot_SIR_model(S, I, R, save_to=args.output)

if __name__ == "__main__":
    main()
We can now run our script using inputs from the command line:
We defined each option with a default, so we don’t need to provide
all of them if we don’t want to. Each option has a long form with two
dashes (--output, --beta), and a short form
with one dash (-o, -b), which are
interchangeable (if we wish, we could provide only the short form or the
long form). Note that we can use either an equals = or a
space to separate the option name from its value.
If we had provided options without preceeding dashes, they would
become ‘positional’ arguments, and would be required. The order
positional arguments should be supplied is given by the order in which
they are added to the parser. For example, if we had added
beta and gamma as follows:
PYTHON
    parser.add_argument(
        "beta", type=float,
        help="Average no. of new infections per infected person per day",
    )
    parser.add_argument(
        "gamma", type=float,
        help="Inverse of average number of days taken to recover",
    )
We would need to supply these arguments in order when running our code. Positional arguments are not specified by name on the command line:
If we forget how our script is supposed to be run,
argparse automatically provides a nice help message if we
run it with -h or --help:
usage: SIR_model [-h] [-p POP_SIZE] [-b BETA] [-g GAMMA] [-d DAYS] [-i I0] [-o OUTPUT]

Solves SIR model and creates a plot

optional arguments:
  -h, --help            show this help message and exit
  -p POP_SIZE, --pop_size POP_SIZE
                        Total population size
  -b BETA, --beta BETA  Average no. of new infections per infected person per day
  -g GAMMA, --gamma GAMMA
                        Inverse of average number of days taken to recover
  -d DAYS, --days DAYS  Number of days to run the simulation
  -i I0, --i0 I0        Number of infected people at the start of the simulation
  -o OUTPUT, --output OUTPUT
                        Output file to save plot to
There are many ways to control our command line interface in more
detail, such as constraining the possible user input choices, parsing
lists of inputs, and using ‘sub-parsers’ to split functionality across a
number of sub-commands, much like how pip handles its many
utilities:
Here, install and list are sub-commands,
which each handle a different set of their own args. We’ll show how to
achieve this in the next lesson, where we’ll expand our code from a
single module to a collection of modules known as a ‘package’.
- Any Python file can be considered a ‘module’, and can be
import-ed. This just runs the code in the file, and makes the names of any objects in the module accessible using dot-notation. - If we bundle our Python scripts into a collection of functions, we can reuse those functions in other modules or in the Python interpretter.
- After turning our scripts into reusable modules, we can maintain
script-like behaviour using the idiom
if __name__ == "__main__". -
argparsecan be used to create sophisticated command line interfaces.
Content from From Modules to Packages
Last updated on 2026-06-16 | Edit this page
Estimated time: 20 minutes
Overview
Questions
- What is a ‘package’ in Python?
- Why should we organise our code into packages?
Objectives
- Explain how to group multiple modules into a package.
- Understand the purpose of an
__init__.pyfile. - Understand how
__all__works. - Understand the purpose of a
__main__.pyfile.
Packages
In the previous lesson, we showed how to convert a simple Python script into a reusable module by bundling up different parts of the script into functions. However, as our project grows, we may find it beneficial to spread the functionality of our project over multiple files. Separating logically distinct units of code into their own files will help others to understand how our project works, and it allows us to control which features of our code are exposed to users at the top level.
The primary tool for organising a project across multiple files is the package. Packages are very similar to modules, and they are defined by the directory structure we use to organise our files.
To demonstrate how to create a package, we’ll convert our SIR model
module from the last lesson into a package. Let’s say we have it stored
within a directory epi_models – short for epidemiology
models:
 📁 epi_models
 |
 |____📜 SIR.py
To convert this to a package, we’ll simply create a new directory –
also called epi_models – and move our Python module to
it:
We’ll also add a new empty file called __init__.py:
Our directory structure should now be:
 📁 epi_models
 |
 |____📦 epi_models
      |

     |____📜 __init__.py
      |____📜 SIR.py
That’s all we need for a basic package! But why did we need to create
a new directory with the same name, and what is __init__.py
for?
- The top-level directory can be thought of as the project directory, while the directory contained within is the package directory. Later, we will add new files to the project directory containing descriptive metadata for our package, and this will allow us to build, install, and publish the package. It is important for these files to be kept outside of the package itself.
- The choice to give the package directory the same name as the project directory is simply a common convention for Python projects, and it’ll make it easier for to build, install and publish our package later. We’ll cover alternative directory layouts in our lesson on building and installing packages.
- The presence of an
__init__.pyfile marks a directory as a package, and the contents of this file are run when the package or any modules within are imported. We’ll explain how to use this file to set up and control our package in a later section.
Namespace Packages
Since Python 3.3, if you omit __init__.py, you may find
that the following code snippets continue to work. This is because
directories without __init__.py act as namespace
packages, which can be used to build a package using multiple
‘portions’ spread across your system. The specification for namespace
packages can be found in PEP
420.
Unless you’re intending to create a namespace package, it is good
practice to include __init__.py, even if you choose to
leave it empty, as this makes your intentions for the package
clearer.
Now that we’ve created a basic package, it is straightforward to expand it to contain additional modules. For example, we may choose to add new epidemiology models, such as the SEIR model which introduces a new population category of those who are Exposed to a pathogen, but not yet infectious themselves (this models diseases such as COVID-19 fairly well). We could also add a SIS model, which is similar to the SIR model, but Recovered individuals do not gain immunity to the pathogen, and instead return to the Susceptible population (this can apply to the common cold and some types of flu). These new modules should be added to the package directory:
TODO: Scrub unimplemented models to reduce complexity
 📁 epi_models
 |
 |____📦 epi_models
      |

     |____📜 __init__.py
      |____📜 SIR.py
      |____📜
SEIR.py
      |____📜 SIS.py
These new modules might contain similar functions to
SIR.py. For example, SEIR.py may contain:
PYTHON
# file: SEIR.py

def SEIR_model(pop_size, alpha, beta, gamma, days, I_0):
    # Function to solve the SEIR model
    # Returns lists S, E, I, R
    pass

def plot_SEIR_model(S, E, I, R):
    # Function to plot S, E, I, R over time
    pass
We won’t worry about how these functions should be implemented for
now. SIS.py should contain similar functions.
To import our functions, we can now enter the top-level
epi_models directory and call the following in an
interactive session:
PYTHON
>>> import epi_models.SIR
>>> S, I, R = epi_models.SIR.SIR_model(
        pop_size=8000000, beta=0.5, gamma=0.1, days=150, I_0=10
    )
Having to type the package name and the module name every time can be
inconvenient, so it’s a good idea to use the alternative
import styles we discussed in the previous lesson:
PYTHON
>>> # Assign an alias to the import
>>> import epi_models.SEIR as SEIR
>>> S, E, I, R = SEIR.SEIR_model(
        pop_size=8000000, alpha=0.2, beta=0.5, gamma=0.1, days=150, I_0=10
    )

>>> # Use 'from ... import ...' to get the function directly
>>> from epi_models.SEIR import SEIR_model
>>> S, E, I, R = SEIR_model(
        pop_size=8000000, alpha=0.2, beta=0.5, gamma=0.1, days=150, I_0=10
    )

>>> # Import everything into the current namespace (not recommended!)
>>> from epi_models.SIS import *
>>> S, E, I, R = SEIR_model(
        pop_size=8000000, alpha=0.2, beta=0.5, gamma=0.1, days=150, I_0=10
    )
As our project develops, we may decide that we need a further level of organisation. For example, if our modelling tools and our plotting tools become sufficently complex, we may decide to move these into their own directories. To do this, we can define sub-packages within our top-level package:
 📁 epi_models
 |
 |____📦 epi_models
      |

     |____📜 __init__.py
      |
      |____📁 models

     |    |
      |    |____📜 __init__.py
      |    |____📜
SIR.py
      |    |____📜 SEIR.py
      |    |____📜 SIS.py

     |
      |____📁 plotting
           |
           |____📜
__init__.py
           |____📜 plot_SIR.py
           |____📜
plot_SEIR.py
           |____📜 plot_SIS.py
Note that each sub-directory, and hence sub-package, requires its own
__init__.py. With our project organised in this way, we can
now import each function using:
Relative Imports
One advantage of organising our code into packages and sub-packages
is that it allows us to import other modules using relative
imports. To show how these work, we’ll add an extra file
utils.py inside the models subpackage.
 📁 epi_models
 |
 |____📦 epi_models
      |

     |____📜 __init__.py
      |
      |____📁 models

     |    |
      |    |____📜 __init__.py
      |    |____📜
SIR.py
      |    |____📜 SEIR.py
      |    |____📜 SIS.py

     |    |____📜 utils.py
      |
      |____📁 plotting

          |
           |____📜 __init__.py
           |____📜
plot_SIR.py
           |____📜 plot_SEIR.py
           |____📜
plot_SIS.py
This could contain utility functions that may be useful within
SIR.py, SEIR.py, and SIS.py. In
each of these files, we could import the function some_func
from utils.py using the following syntax:
The dot preceding the module name instructs Python to search inside the current (sub-)package to find a module with a matching name.
We may also find it useful for our plotting tools to have access to
the modelling functions. In that case, we can add the following to
plot_SIR.py:
Here, the double dots indicate that we should look one package higher than the current sub-package.
Note that relative imports only work within packages, so they should be avoided in our plain scripts.
The __init__.py file
__init__.py files do not need to contain any code to
mark a directory as a Python package, but if we wish, we can use them to
control what is or isn’t visible at package-level scope, or to perform
any additional setup.
TODO: This needs an interactive exercise. What happens without importing anything in init?
Consider the __init__.py file in the models
directory. Let’s add the following lines:
PYTHON
# file: epi_models/models/__init__.py

from .SIR import SIR_model
from .SEIR import SEIR_model
from .SIS import SIS_model
When SIR_model, SEIR_model and
SIS_model are brought into the local namespace in
models/__init__.py, they are brought into the namespace of
epi_models.models too:
PYTHON
>>> from epi_models.models import SIR_model
>>> # Equivalent to:
>>> from epi_models.models.SIR import SIR_model
If we wish to expose these functions to the user at the top level
package, we can also add the following to
epi_models/__init__.py
Note that we can import these names directly from the
models sub-package instead of going to each of the modules
in turn. It is now much easier for users to access these functions:
When writing __init__.py files, it is important to
consider what we don’t import. Note that we did not import any
functions from utils.py, as these are only intended for use
within the models sub-package, and there’s no need to
expose these implementation details to the user. A well crafted
__init__.py allows us to define a public API,
which is the portion of our code that we expect our users to interact
with. The following section introduces the __all__
variable, which allows us to more rigorously define a public API.
As the contents of __init__.py is run whenever the
package or any sub-packages/modules are imported, we can also use
__init__.py to perform any additional package-level setup.
For instance, it might be used to set up connection to a database used
throughout the package. In this way, __init__.py performs a
similar role for a package as an __init__ function does for
a class.
Using __all__ to control
from module import *
__all__ is an optional variable that we may set in our
modules and packages (to assign it to a package, it should be defined in
__init__.py). It should be a list of strings matching the
names of all objects – including functions, classes, constants and
variables – that we wish to be considered ‘public’ features that the
user may wish to use.
__all__ also changes the behaviour of
from module import *. By default, this would import all
objects within the namespace of module, and bring them into
the current namespace. This may not be desirable, as this may bring
utility functions/classes/variables into the current scope, including
any objects we explicitly mark as private using a preceeding underscore,
and even anything we’ve imported. If we set __all__, only
those objects with names matching the strings contained within
__all__ will be loaded. For example, if we wrote the
following:
PYTHON
# file: epi_models/__init__.py

from .models import SIR_model, SEIR_model, SIS_model
__all__ = ["SIR_model", "SEIR_model"] # Note SIS_model is missing!Calling the following in an interactive session would work just fine:
OUTPUT
<function SIR_model at 0x7f0290dc9150>However, the following would fail:
OUTPUT
Traceback (most recent call last):
  File "<stdin>", line 1, in <module>
NameError: name 'SIS_model' is not defined
TODO: remove discussion of private variables :::::::::::::::::::::: discussion
‘Private’ variables in Python
It is common for Python programmers to mark objects as private by
prefixing their names with an underscore. For example,
_private_variable or _PrivateClass. For an
added layer of protection, variables set in class instances with two
underscores, such as self.__x, will have their names
mangled when viewed from outside the class, but they will still be
locatable and modifiable by a determined individual.
Python programmers will also sometimes use a trailing underscore, and this is commonly used to avoid a name clash with a built-in object:
A combination of the private naming convention, well chosen
__all__ variables, and thorough documentation is more than
sufficient to specify a public API.
::::::::::::::::::::::::::::::
Script-like Packages and the __main__.py file
In the previous lesson, we introduced the
if __name__ == "__main__" idiom, and discussed how to use
this to maintain script-like behaviour in our reusable modules. The good
news is that this is still possible when we upgrade our modules to
packages. For instance, let’s say that the file
epi_models/plotting/plot_SIR contains the following, which
excludes the enhancements added in the ‘extra’ section last lesson:
PYTHON
# file: plot_SIR.py

import matplotlib.pyplot as plt

def plot_SIR_model(S, I, R):
    """
    Plot the results of a SIR simulation.

    Parameters
    ----------
    S: List[float]
        Number of susceptible people on each day.
    I: List[float]
        Number of infected people on each day.
    R: List[float]
        Number of recovered people on each day.

    Returns
    -------
    None
    """
    plt.plot(range(len(S)), S, label="S")
    plt.plot(range(len(I)), I, label="I")
    plt.plot(range(len(R)), R, label="R")
    plt.xlabel("Time /days")
    plt.ylabel("Population")
    plt.legend()
    plt.show()

def main():
    S, I, R = SIR_model(
        pop_size=8000000, beta=0.5, gamma=0.1, days=150, I_0=10
    )
    plot_SIR_model(S, I, R)

if __name__ == "__main__":
    main()
If we jump into the directory epi_models/plotting, and
call the following, we get an error:
OUTPUT
Traceback (most recent call last):
  File "plot_SIR.py", line 2, in <module>
    from ..models.SIR import SIR_model
ImportError: attempted relative import with no known parent package
When running a single file as if its a script, Python will not
consider it to be part of a wider package, and hence relative imports
will fail. To solve this, we should run our script from outside the
package using the -m flag:
Note that we use dots rather than slashes to separate the names of
each sub-package/module, and we don’t include .py at the
end.
We can also add script-like behaviour to packages by adding a
__main__.py file:
 📁 epi_models
 |
 |____📦 epi_models
      |

     |____📜 __init__.py
      |____📜 __main__.py
      |

     |____📁 models
      |    |
      |    |____📜
__init__.py
      |    |____📜 SIR.py
      |    |____📜
SEIR.py
      |    |____📜 SIS.py
      |    |____📜 utils.py

     |
      |____📁 plotting
           |
           |____📜
__init__.py
           |____📜 plot_SIR.py
           |____📜
plot_SEIR.py
           |____📜 plot_SIS.py
As the module name of this file is already __main__,
there’s no need to use the if __name__ == "__main__" idiom,
and we may write this file as if it were a simple script. If we wish to
run the scripting interface from plot_SIR.py, we can do so
simply by importing and calling the function main():
If we add a different scripting interface for each model type, we can
use sys.argv to read the user’s model choice from the
command line:
PYTHON
# file: __main__.py

import sys
from plotting.plot_SIR import main as SIR_main
from plotting.plot_SEIR import main as SEIR_main
from plotting.plot_SIS import main as SIS_main

# Read model type from the command line
model = sys.argv[1]

# Run the chosen model
if model == "SIR":
    SIR_main()
elif model == "SEIR":
    SEIR_main()
elif model == "SIS":
    SIS_main()
else:
    raise RuntimeError(
        "First cmd line arg should be 'SIR', 'SEIR', or 'SIS'"
    )
If you do intend to add scripting behaviour to your packages, it is
highly recommended to read the ‘extra’ sections in this lesson and the
previous one, as argparse allows you to build much more
sophisticated command line interfaces.
Extra: Advanced argparse in
__main__.py
TODO: Remove advanced argparse section
Let’s return to plot_SIR.py, and apply the enhancements
discussed in the ‘extra’ sections last lesson:
PYTHON
import matplotlib.pyplot as plt
from argparse import ArgumentParser
from ..models.SIR import SIR_model

def plot_SIR_model(S, I, R, ax=None, save_to=None, show=False):
    """
    Plot the results of a SIR simulation.

    Parameters
    ----------
    S: List[float]
        Number of susceptible people on each day.
    I: List[float]
        Number of infected people on each day.
    R: List[float]
        Number of recovered people on each day.
    ax: Optional[plt.Axes], default None
        Axes object on which to create the plot.
        A new Axes is created if this is None.
    save_to: Optional[str], default None
        Name of the file to save the plot to.
        Does not save if None.
    show: bool, default False
        If True, call plt.show() on completion.

    Returns
    -------
    plt.Axes
        The axes object the results have been plotted to.
    """
    # Use plt.subplots to create Figure and Axes objects
    # if one is not provided.
    if ax is None:
        fig, ax = plt.subplots()

    # Create plot
    ax.plot(range(len(S)), S, label="S")
    ax.plot(range(len(I)), I, label="I")
    ax.plot(range(len(R)), R, label="R")
    ax.set_xlabel("Time /days")
    ax.set_ylabel("Population")
    ax.legend()

    # Optionally save the figure
    if save_to is not None:
        fig = ax.get_figure()
        fig.savefig(save_to)

    # Optionally show the figure
    if show:
        plt.show()

    return ax

def main():
    # Create an argument parser object. We can provide
    # some info about our program here.
    parser = ArgumentParser(
        prog="SIR_model",
        description="Solves SIR model and creates a plot",
    )

    # Add each argument to the parser. We can specify
    # the types of each argument. Optional arguments
    # should have single character names with a hypen,
    # or longer names with a double dash.
    parser.add_argument(
        "--version",
        action="version",
        version="%(prog)s {version}".format(version=__version__),
        help="Show program's version number and exit.",
    )
    parser.add_argument(
        "-p", "--pop_size", type=int, default=10000000,
        help="Total population size",
    )
    parser.add_argument(
        "-b", "--beta", type=float, default=0.5,
        help="Average no. of new infections per infected person per day",
    )
    parser.add_argument(
        "-g", "--gamma", type=float, default=0.1,
        help="Inverse of average number of days taken to recover",
    )
    parser.add_argument(
        "-d", "--days", type=int, default=150,
        help="Number of days to run the simulation",
    )
    parser.add_argument(
        "-i", "--i0", type=int, default=10,
        help="Number of infected people at the start of the simulation",
    )
    parser.add_argument(
        "-o", "--output", default="SIR_model.png",
        help="Output file to save plot to",
    )

    # Get each argument from the command line
    args = parser.parse_args()

    # Run our code
    S, I, R = SIR_model(
        pop_size=args.pop_size,
        beta=args.beta,
        gamma=args.gamma,
        days=args.days,
        I_0=args.i0,
    )
    plot_SIR_model(S, I, R, save_to=args.output)

if __name__ == "__main__":
    main()
Finally, we will need to add __version__ variable to
init.py
We can now check the version using the --version
argument.
- Packages can be used to better organise our code as it becomes more complex
- Packages are defined by a directory structure and the presence of
__init__.py - By controlling what is or isn’t imported in
__init__.py, we can define a public API for our project. - A package can be run as a script using the
-mflag, provided it contains a file__main__.py. - Through clever use of
argparse, we can provide a rich scripting interface to a whole package.
Content from Building and Installing Packages using hatch
Last updated on 2026-06-16 | Edit this page
Estimated time: 20 minutes
Overview
Questions
- How can we manage our Python environment?
- How can we install our own packages?
Objectives
- Use
condato manage Python environments - Understand what happens when we install a package
- Use
pipandhatchto install packages to our local environment
Introduction
In the first lesson, we showed how to use the PYTHONPATH
environment variable to enable us to import our modules and packages
from anywhere on our system. There are a few disadvantages to this
method:
- If we have two different versions of a package on our system at
once, it can be tedious to manually update
PYTHONPATHwhenever we want to switch between them. - If we have multiple Python environments on our system (using tools
such as
venvorconda), settingPYTHONPATHwill affect all of them. This can lead to unexpected dependency conflicts that can be very hard to debug. - If we share our software with others and require them to update
their own
PYTHONPATH, they will need to install any requirements for our package separately, which can be error prone.
It would be preferable if we could install our package using
pip, the same way that we would normally install external
Python packages. However, if we enter the top level directory of our
project and try the following:
We get the following error:
OUTPUT
ERROR: Directory '.' is not installable. Neither 'setup.py' nor 'pyproject.toml' found.In order to make our project installable, we need to add the either
the file pyproject.toml or setup.py to our
project. For modern Python projects, it is recommended to write only
pyproject.toml. This was introduced by PEP 517, PEP 518 and PEP 621 as a standard way
to define a Python project, and all tools that build, install, and
publish Python packages are expected to use it.
By making our project pip-installable, we’ll also make
it very easy to publish our packages on public repositories – this will
be covered in our lesson on package
publishing. After publishing our work, our users will be able to
download and install our package using pip from any machine
of their chocie!
To begin, we’ll introduce the concept of a ‘Python environment’, and how these can help us manage our workflows.
Managing Python Environments
When working with Python, it can sometimes be beneficial to install packages to an isolated environment instead of installing them globally. Usually, this is done to manage competing dependencies:
- Project B might depend upon Project A, but may have been written to use version 1.0.
- Project C might also depend upon Project A, but may instead only work with version 2.0.
- If we install Project A globally and choose version 2.0, then Project B will not work. Similarly, if we choose version 1.0, Project C will not work.
A good way to handle these sorts of conflicts is to instead use
virtual environments for each project. A number of tools have
been developed to manage virtual environments, such as
venv, which is a standard built-in Python tool, and
conda, which is a powerful third-party tool.
You can pip install packages into a conda
virtual environment.
If we’re using Linux, we can find which Python environment we’re using by calling:
If we’re using the default system environment, the result is something like the following:
OUTPUT
/usr/bin/pythonTo create a new conda environment called “packaging”
with Python v3.12 installed, we can call:
BASH
# Create a new environment
$ conda create -n packaging python=3.12 matplotlib hatch -c conda-forge

# It is a good idea to clean up cached and unused files
$ conda clean --all

# You can always check available envs with
$ conda env list
Now we can activate our new conda environment:
BASH
# Start the env
$ conda activate packaging

# To check which packages are installed in the env run:
$ conda list
Checking which Python we’re running should now give a different result:
OUTPUT
/Users/username/miniforge3/envs/packaging/bin/pythonIf we now install a new package, it will be installed within our new virtual environment instead of being installed to the system libraries. For example:
We can check the location of numpy using
pip show:
site-packages is a standard location to store installed
Python packages.
If we no longer wish to use this virtual environment, we can return to the base environment by calling:
Virtual environments are very useful when we’re testing our code, as they allow us to create a fresh Python environment without any of the installed packages we normally use in our work. This will be important later when we add dependencies to our package, as this allows us to test whether our users will be able to install and run our code properly using a fresh environment.
An Overview of TOML files
pyproject.toml is a TOML file, which stands for ‘Tom’s
Obvious Minimal Langauge’ (named for its developer, Thomas
Preston-Werner, who cofounded GitHub). There are many configuration file
formats in common usage, such as YAML, JSON, and INI, but the Python
community chose TOML as it provides some benefits over the
competition:
- Designed to be human writable and human readable.
- Can map unambiguously to a hash table (a
dictin Python). - It has a formal specification, so has an unambiguous set of rules.
A TOML file contains a series of key = value pairs,
which may be grouped into sections using a header enclosed in square
brackets, such as [section name]. The values are typed,
unlike some other formats where all values are strings. The available
types are strings, integers, floats, booleans, and dates. It is possible
to store lists of values in arrays, or store a series of key-value pairs
in tables. For example:
TOML
# file: mytoml.toml

int_val = 5
float_val = 0.5
string_val = "hello world"
bool_val = true
date_val = 2023-01-01T08:00:00
array = [1, 2, 3]
inline_table = {key = "value"}

# Section headings allow us to define tables over
# multiple lines
[header_table]
name = "John"
dob = 2002-03-05


# We can define subtables using dot notation
[header_table.subtable]
foo = "bar"
We can read this using the tomllib library in
Python:
PYTHON
>>> import tomllib
>>> with open("mytoml.toml", "r") as f:
...     data = toml.load(f)
>>> print(data)
The result is a dictionary object, with TOML types converted to their corresponding Python types:
{
    'int_val': 5,
    'float_val': 0.5,
    'string_val': 'hello world',
    'bool_val': True,
    'date_val': datetime.datetime(2023, 1, 1, 8, 0),
    'array': [1, 2, 3],
    'inline_table': {'key': 'value'},
    'header_table': {
        'name': 'John',
        'dob': datetime.date(2002, 3, 5),
        'subtable': {
            'foo': 'bar'
        }
    }
}
Installing our package with pyproject.toml
First, we will show how to write a relatively minimal
pyproject.toml file so that we can install our projects
using pip. We will then cover some additional tricks that
can be achieved with this file:
- Use alternative directory structures
- Include any data files needed by our code
- Generate an executable so that our scripts can be run directly from the command line
- Configure our development tools.
To make our package pip-installable, we should add the
file pyproject.toml to the top-level
learn-hatch directory:
 📁 learn-hatch
 |
 |____📜 pyproject.toml
 |

|____📁 src
      |
      |____📦 epi_models
           |

          |____📜 __init__.py
           |____📜 __main__.py

          |
           |____📁 models
           |    |

          |    |____📜 __init__.py
           |    |____📜 SIR.py

          |    |____📜 SEIR.py
           |    |____📜 SIS.py

          |    |____📜 utils.py
           |
           |____📁
plotting
                |
                |____📜 __init__.py

               |____📜 plot_SIR.py
                |____📜
plot_SEIR.py
                |____📜 plot_SIS.py
The first section in our pyproject.toml file should
specify which build system we wish to use, and additionally specify any
version requirements for packages used to build our code.
We will choose to use hatchling, which requires the
following:
TOML
# file: pyproject.toml

[build-system]
requires = ["hatchling"]
build-backend = "hatchling.build"-
requiresis set to a list of strings, each of which names a dependency of the build system and (optionally) its minimum version. This uses the same version syntax aspip. -
build-backendis set to a sub-module ofhatchlingwhich implements the PEP 517 build interface.
With our build system determined, we can add some metadata that defines our project. At a minimum, we should specify the name of the package, its version, and our dependencies:
TOML
# file: pyproject.toml

# Build system configuration
[build-system]
requires = ["hatchling"]
build-backend = "hatchling.build"

# Project metadata
[project]
name = "epi_models"
version = "0.1.0"
dependencies = [
    "matplotlib",
]

# Hatch build configuration
[tool.hatch.build]
source = "src"
That’s all we need! We’ll discuss versioning in our lesson on publishing. With this done, we can install our package using:
This will automatically download and install our dependencies, and our package will be importable regardless of which directory we’re in.
The installed package can be found in the directory
/Users/username/miniforge3/envs/packaging/lib/python3.12/site-packages/epi_models.
If we look inside our installed package, we’ll see that our files
have been copied, and there is also a __pycache__
directory:
__init__.py __main__.py models plotting __pycache__The __pycache__ directory contains Python bytecode,
which is a lower-level version of Python that is understood by the
Python Virtual Machine (PVM). All of our Python code is converted to
bytecode when it is run or imported, and by pre-compiling our package it
can be imported much faster. If we look into the directories
models and plotting, we’ll see those have been
compiled to bytecode too.
If we wish to uninstall, we may call:
We can also create an ‘editable install’, in which any changes we make to our code are instantly recognised by any codes importing it – this mode can be very useful when developing our code, especially when working on documentation or tests.
The ability to create editable installs from a
pyproject.toml-only build was standardised in PEP 660, and only recently
implemented in pip. You may need to upgrade to use this
feature:
There are many other options we can add to our
pyproject.toml to better describe our project. PEP 621 defines a minimum
list of possible metadata that all build tools should support, so we’ll
stick to that list. Each build tool will also define synonyms for some
metadata entries, and additional tool-specific metadata. Some of the
recommended core metadata keys are described below:
TOML
# file: pyproject.toml


# Build system configuration
[build-system]
requires = ["hatchling"]
build-backend = "hatchling.build"

# Project metadata
[project]
name = "epi_models"
version = "0.1.0"
dependencies = [
    "matplotlib",
]

# A simple summary of the project
description = "My wonderful Python package"


# Full description of the project.
# Should be the path to your README file, relative to pyproject.toml
readme = "README.md"

# The Python version required by the project
requires-python = ">=3.8"

# The license of your project.
# Can be provided as a file or a text description.
# Discussed in the lesson on publishing
license = {file = "LICENSE.md"}
# or...
license = {text = "BDS 3-Clause License"}


# Authors / maintainers
# Each entry can have a name and/or an email
authors = [
    {name = "My Name", email = "my.email@email.net"},
    {name = "My Friend", email = "their.email@email.net"},
]

# dependencies: Array of Strings
# A list of requirements for our package
dependencies = [
    "matplotlib",
]

# Project URLs
[project.urls]
homepage = "https://github.com/username/learn-hatch"
documentation = "https://github.com/username/learn-hatch"
repository = "https://github.com/username/learn-hatch"

# Hatch build configuration
[tool.hatch.build]
source = "src"
TODO: Discuss including package data file with hatch.
Installing Scripts
If our package contains any scripts and/or a __main__.py
file, we can run those from anywhere on our system after
installation:
With a little extra work, we can also install a simplified interface
that doesn’t require python -m in front. This is how tools
like pip can be invoked using two possible methods:
This can be achieved by adding a table scripts under the
[project] header:
TOML
# file: pyproject.toml

# Add entry points
[project.scripts]
epi_models = "epi_models.__main__:main"
This syntax means that we should create a console script
epi_models, and that running it should call the function
main() from the file epi_models/__main__.py.
This will require a slight modification to our __main__.py
file. All that’s necessary is to move everything from the script into a
function main() that takes no arguments, and then to call
main() at the bottom of the script:
This will allow us to run our package as a script directly from the command line
Note that we’ll still be able to run our code using the longer form:
If we have multiple scripts in our package, these can all be given invidual console scripts. However, these will also need to have a function name as an entry point:
TOML
# file: pyproject.toml

[project.scripts]
epi_models = "epi_models.__main__:main"
epi_models_sir = "epi_models.plotting.plot_SIR:main"
TODO: remove this?
So how do these scripts work? When we activate a virtual environment,
a new entry is added to our PATH environment variable
linking to /path/to/my/env/bin/:
After installing our console scripts, we can find a new file in this
directory with the name we assigned to it. For example,
/path/to/my/env/bin/epi_models:
PYTHON
#!/path/to/my/env/bin/python
# -*- coding: utf-8 -*-
import re
import sys
from epi_models.__main__ import main
if __name__ == '__main__':
    sys.argv[0] = re.sub(r'(-script\.pyw|\.exe)?$', '', sys.argv[0])
    sys.exit(main())
Installing our project has automatically created a new Python file
that can be run as a command line script due to the hash-bang
(#!) on the top line, and all it does it import our main
function and run it. As it’s contained with the bin/
directory of our Python environment, it’s available for use as long
we’re using that environment, but as soon as we call
deactivate, it is removed from our PATH.
Setting Dependency Versions
TODO: make this an info box.
Earlier, when setting dependencies in our
pyproject.toml, we chose to specify a minimum requirement
for numpy, but not for pyyaml:
This indicates that pip should install any version of
numpy greater than 1.20, but that any version of
pyyaml will do. If our installed numpy version
is less than 1.20, or if it isn’t installed at all, pip
will upgrade to the latest version that’s compatible with the rest of
our installed packages and our Python version. We’ll cover software
versioning in more detail in the lesson on
publishing, but now we’ll simply cover some ways to specify which
software versions we need:
TOML
"numpy >= 1.20"  # Must be at least 1.20
"numpy > 1.20"   # Must be greater than 1.20
"numpy == 1.20"  # Must be exactly 1.20
"numpy <= 1.20"  # Must be 1.20 at most
"numpy < 1.20"   # Must be less than 1.20
"numpy == 1.*"   # Must be any version 1
If we separate our clauses with commas, we can combine these requirements:
A useful shorthand is the ‘compatible release’ clause:
This is equivalent to:
That is, we require anything which is version 1, provided it’s greater than 1.20. This would include version 1.25, but exlude version 2.0. We’ll come back to this later when we discuss publishing.
Optional Dependencies
Sometimes we might have dependencies that only make sense for certain
kind of user. For example, a developer of our library might need any
libraries we use to run unit tests or build documentation, but an end
user would not. These can be added as
optional-dependencies:
TOML
# file: pyproject.toml

[project.optional-dependencies]
test = [
    "pytest >= 5.0.0",
]
doc = [
    "sphinx",
]
These dependencies can be installed by adding the name of each
optional dependency group in square brackets after telling
pip what we want to install:
BASH
$ pip install ".[test]"     # Include testing dependencies
$ pip install ".[doc]"     # Include documentation dependencies
$ pip install ".[test,doc]" # Include all dependencies- We can configure our projects for
pipinstallation by setting up apyproject.tomlfile. - Simple projects require very little to be added to this file, but there are many optional extras we can add.
Content from Publishing our Python Packages
Last updated on 2026-06-16 | Edit this page
Estimated time: 30 minutes
TODO: replace build and twine with hatch. local build with hatch.
demo push to test-pypi. TODO: pip install from github TODO: vcs based
versioning with git tags and hatch (like setuptools-vcs) TODO: Update
github action to use hatch and push to test-pypi TODO: Change demo
package name to
Overview
Questions
- What services can we use to publish our software?
- What steps must we take to accomplish this?
Objectives
- Learn how to version our software and create releases.
- Learn how to publish our software on PyPi, the Python Packaging Index.
Publishing our Python Packages
Following our lesson on building and installing
Python packages, we should now have a package that can be installed
using pip. With just a little more work, we can now publish
our software on a few free online services: GitHub for source/version
control, and PyPI (the Python Packaging Index) for package hosting. The
latter is the default repository used by pip, so by hosting
our software there, other users will be able to install our software to
any machine of their choosing, and will be able to add it as a
dependency to their own projects.
Before discussing how to use these services, we’ll briefly cover ‘semantic versioning’: a method for adding meaningful versions to our software containing compatibility information, and we’ll look at some of the preparatory steps we should take before publishing our code.
Versions and Releases
Users of our software will expect it to stay consistent over time. If we were to suddenly rename a function, or change what arguments it takes, this could break our user’s code, which in turn could break another developer’s code, etc.
A good solution to this problem is to use ‘semantic versioning’, in which the version number contains compatibility information in a widely agreed-upon format. Using semanic versioning, we will periodically make a new ‘release’ of our code, each time updating its version number, and the way we change the number informs our users of whether the changes to our code will break compatibility. In its most basic form, semantic versioning requires 3 numbers, separated by periods, such as 1.2.3. These numbers stand for MAJOR.MINOR.PATCH, and are typically updated right-to-left. The meaning of each number is:
- PATCH: We increment the patch number whenever we make an update that doesn’t add or remove functionality. It can include things such as backwards-compatible bug fixes, internal code restructuring, and performance improvements.
- MINOR: The minor version should be incremented whenever we add new backwards-compatible features to our code. This can include the addition of new functions and classes. Whenever we increment the minor version, the patch version is reset to zero.
- MAJOR: The major version should be incremented whenever we make a change that breaks backwards compatibility. This could include changing a function name or signature, or removing something from the public API. It can also include changing a function’s behaviour in a significant way. Whenever we increment the major version, both the minor version and patch version should be reset to zero.
We can add a version to our code by adding a __version__
to our top-most __init__.py file:
This should also be reflected in our pyproject.toml:
To avoid having to keep these up-to-date manually, we’ll see later
how to automatically generate version info using git
tags.
Something to note about the major and minor version numbers is that they only need to be updated if we change the public API of our software. Therefore, if we change the behaviour of any functions or classes intended for internal use, and the public API is unchanged, we only need to update the patch number.
Unstable Versions
Software with a major version of 0 is usually understood to be ‘unstable’. This means that anything can change between minor versions, and that no promises can be made for backwards compatibility. This is common for software in early stages of development, as the public API may undergo many iterations before being finalised.
For your own software, it may be a good idea to keep the major number at zero while you’re hashing out the public API and building a userbase. Once you’ve settled on a stable API, or you’ve developed a sizable userbase that won’t appreciate having to regularly update their code to match your changing standards, you should consider setting your version to 1.0.0.
If one of the dependencies in your project is still in an unstable
state, it may be a good idea to fix the minor version number instead of
using the compatible release comparator ~=:
This is because the ~= 0.6 will get the latest release
which is at least 0.6.0 but less than1.0.0,
but in this case version 0.7 might break backwards
compatibility with 0.6. Note that some unstable projects
may also break backwards compatibiliy in their patch releases. In these
cases, it may be better to fix even the patch number:
Deprecation
It is considered good manners to give our users plenty of warning if we plan to remove features that they might depend upon in our next major release. For this reason, many developers will implement deprecation warnings to alert users that the API is due to change in future, and that they should update their code accordingly. For example:
PYTHON
import warnings

def myfunc():
    warnings.warn(
        "myfunc is deprecated, and wil be removed in version 4",
        DeprecationWarning,
    )
    return 42
When adding deprecations to our code, we should update the minor version, and include them in our changelog. When we follow through on our deprecations and remove features, this should also be clearly stated in the changelog of our major release.
Extra: Advanced Versioning
This section may be skipped.
There are many more fine-grained versioning techniques that may be
employed as our projects grow in complexity, although these are not
universally adopted and may only be applicable to very large projects
with a detailed review process. The full list of version types accepted
by tools such as pip is listed in PEP 440, while the formal
specification for semantic versioning can be found at semver.org. For example, we may provide
pre-release specifiers:
- 1.1.0a0: The first alpha version of 1.1.0. This is intended for use by developers of the project and (perhaps) a small group of users, and may be subject to large changes. 1.1.0a0 comes after 1.0.N, but before 1.1.0. A second alpha version may be listed as 1.1.0a1.
- 1.1.0b0: The beta version of 1.1.0. This follows 1.1.0aN, and is intended for use by a wider pool of users for further testing and feedback. This is usually close to the finished product, but some large changes remain possible.
- 1.1.0rc0: The release-candiate version of 1.1. Sometimes called a ‘preview’ version, it is not expected that further significant changes will be made in version 1.1, but some small changes may be included. It comes after 1.1.0bN, but before 1.1.0.
The number following the pre-release specifier is optional, with no
number interpretted as 0 (for example, 1.0.0a == 1.0.0a0).
A dot, hyphen, or underscore separator is also allowed, such as
1.0.0-a1, 1.1.0.beta.3, or
1.1.0-rc.2. We may also make post-releases if we
wish to make minor edits after a release:
- 1.1.0post0: An update after a release that does not change the distributed software. For example, a change in documentation or release notes. It comes after 1.1.0 but before 1.1.1.
Similarly, post-release specifiers may have dot, hypen or underscore separators, and may exclude the trailing number. The use of ‘rev’ or ‘r’ in place of ‘post’ is also common. Note that a post-release is not the appropriate place for a quick bug fix after a full release – that should be an update to the patch number.
Finally, it is possible to create local versions in cases where a
developer has made progress on a new development but has not finalised
their work in a new release. If you use a tool such as Git to control
your versioning, it may automatically generate the local version. In
general, there is no ordering to local versions. A local version is
specified with a + followed by a dot-separated list of
numbers, letters, and hyphens, for example 1.1.0+001 or
1.2.0-alpha-630-g60eca14.
Preparing to Publish
README Files
Before sharing our software with the world, it is a good idea to let
others know what it is and how it works! A good README file should
explain what a project is for, how users can install it, and how to use
it. For example, we may use the following file README.md,
written using markdown:
MARKDOWN
    # epi_models

    A collection of Python utilities for solving epidemiology problems.

    ## Installation

    The project can be installed using \`pip\`:

    ```
    $ pip install epi_models
    ```

    To install from this repo:

    ```
    $ git clone github.com/username/learn-hatch
    $ cd epi_models
    $ pip install .
    ```

    ## Usage

    The project offers a command line interface, which can be used as
    follows:

    ```
    $ epi_models SIR input.yaml
    ```

    `SIR` can be exchanged for a model of your choice, and `input.yaml`
    is an input file with the following entries...
This should be included at the top level of our project:
 📁 learn-hatch
 |
 |____📜 pyproject.toml
 |____📜
README.md
      📁 src
      |
      |____📦 epi_models

          |
           |____📜 __init__.py
           |____📜
__main__.py
           |____📁 models
           |____📁
plotting
It should be included in our package metadata by adding the following
line in our pyproject.toml:
Licensing
It is important for our software to have a license so that any potential users know what their rights are with regards to usage and redistribution. This can also provide us with legal protections in some cases.
There are several open source licenses available, and they can be
applied to our project simply by adding a LICENSE,
LICENSE.txt, or LICENSE.md file to the top
level of our project:
 📁 learn-hatch
 |
 |____📜 pyproject.toml
 |____📜
README.md
 |____📜 LICENSE.md
      📁 src
      |

     |____📦 epi_models
           |
           |____📜
__init__.py
           |____📜 __main__.py
           |____📁
models
           |____📁 plotting
One of the simplest and most widely used licenses is the MIT License, which is very permissive. It requires users of your software to retain its copyright notice if they redistribute or modify it (or ‘substantial portions’ of it), but otherwise allows users to do what they wish. It also ensures the author is not liable for anything the users do with their software:
MIT License

Copyright (c) [year] [fullname]

Permission is hereby granted, free of charge, to any person obtaining a copy
of this software and associated documentation files (the "Software"), to deal
in the Software without restriction, including without limitation the rights
to use, copy, modify, merge, publish, distribute, sublicense, and/or sell
copies of the Software, and to permit persons to whom the Software is
furnished to do so, subject to the following conditions:

The above copyright notice and this permission notice shall be included in all
copies or substantial portions of the Software.

THE SOFTWARE IS PROVIDED "AS IS", WITHOUT WARRANTY OF ANY KIND, EXPRESS OR
IMPLIED, INCLUDING BUT NOT LIMITED TO THE WARRANTIES OF MERCHANTABILITY,
FITNESS FOR A PARTICULAR PURPOSE AND NONINFRINGEMENT. IN NO EVENT SHALL THE
AUTHORS OR COPYRIGHT HOLDERS BE LIABLE FOR ANY CLAIM, DAMAGES OR OTHER
LIABILITY, WHETHER IN AN ACTION OF CONTRACT, TORT OR OTHERWISE, ARISING FROM,
OUT OF OR IN CONNECTION WITH THE SOFTWARE OR THE USE OR OTHER DEALINGS IN THE
SOFTWARE.
Information on alternative open source licenses can be found at choosealicense.com. Note that your choice of license may be determined by your dependencies. For example, if your code uses software licensed under the GNU GPLv3.0 license, it too should be licensed under GPLv3.0.
We should include our license in our pyproject.toml file
as follows:
We can instead simply state the name of the license:
If you’re developing code on behalf of an organisation, it’s worth checking in with their legal team (or at the very least, your supervisor) before deciding on a license.
Publishing our Software on GitHub
git is a powerful version control tool that allows us to
track changes to our source code over time. This lesson is not the place
for teaching how to use git, but it is highly recommended
that you use it for managing your Python projects.
GitHub is an online service for hosting git-based
software projects, and it is a great way to share our code and
collaborate with others.
Once our code is hosted on GitHub, we can create releases and assign them a tag. This tag should be the version number of the release. We will see later how to use GitHub Actions to automatically publish our code on other services whenever a new release is created.
Whenever we make new releases of our code, we should write a detailed changelog that describes all of the changes since the last version. This should include new features, bug fixes, removals, and deprecations. A good changelog document should include all code changes in reverse chronological order (so the latest changes should be first in the list), and should credit anybody who contributed to the code.
With our code hosted on GitHub, it is possible for others to install
it using pip:
However, this will simply get the latest commit to the main branch,
which may be a work-in-progress and not a true release. We can specify a
particular release by providing the version number after an
@ sign:
Note that we can also supply a branch name or a commit hash here:
BASH
$ pip install "git+https://github.com/user/project@branch"
$ pip install "git+https://github.com/user/project@1a2b3c4"
Projects hosted on GitHub can also be added to dependencies in
pyproject.toml as so:
However, it is relatively slow for pip to install in
this way, as it must clone the whole repository. We can instead install
from a snapshot by pointing pip towards an archived
.zip:
However, this is still slower than installing from a dedicated Python
package repository such as PyPI, which hosts pre-built .whl
files, and it only allows our users to specify a single version of our
code. This means that they may miss out on crucial patch releases. In
general, it is a good idea to use GitHub to host our source code and to
manage its development, and to use a service like PyPI to host packages
that our users can install.
Extra: Consistent Versioning with hatch-vcs
An issue with using GitHub to create new releases is that the project version can easily become desynced. The version needs to be specified in three places:
-
gittags, determined by releases on GitHub - The
versionfield inpyproject.toml -
__version__in our__init__.py
It is possible to have all three determined by git tags
using hatch-vcs. This can be set as a requirement of the
build system:
TOML
# file: pyproject.toml

# Build system configuration
[build-system]
requires = ["hatchling", "hatch-vcs"]

build-backend = "hatchling.build"
With this, we no longer need to provide an entry for
project.version, and instead should add:
TOML
# file: pyproject.toml

[project]
name = "epi_models"
# version = "1.2.3" # no longer needed!
dynamic = ["version"]
Following this, we should add the following section elsewhere in
pyproject.toml:
TOML
# file: pyproject.toml

# Hatch versioning configuration
[tool.hatch.version]
source = "vcs"

# Version control system (VCS) versioning
[tool.hatch.version.vcs]
tag-pattern = "v*"  # Git tags starting with 'v' will be used for versioning
fallback-version = "0.0.0"

# Version file location for VCS
[tool.hatch.build.hooks.vcs]
version-file = "src/epi_models/_version.py"
Now, when we install or build the project, hatch-vcs
will create a new file _version.py inside of our built
package. If our git tag is 1.2.3, this will contain:
PYTHON
# file generated by setuptools_scm
# don't change, don't track in version control
__version__ = version = '1.2.3'
__version_tuple__ = version_tuple = (1, 2, 3)
This can be retrieved at runtime by adding the following to
__init__.py:
Now, our Git tags, __version__, and
pyproject.toml version will automatically be
kept in sync.
We will need to add the dynamically generated
_version.py to our .gitignore
Adding git tags
Before adding a new tag we should commit all our current changes and push them to our remote repo.
Then we can add a new tag like so:
BASH
# list tags
git tag

# Add new tag
git tag -a 0.1.0 -m "Initial minor release"

# Push the tag to github
git push origin 0.1.0

# list tags
git tag
Now that we have a new tag let’s re-install the package and check the version:
PyPI, the Python Packaging Index
PyPI is the official package
repository for the Python community. It is equivalent to CRAN, used for
the R programming language. This is the repository that pip
uses when we install remote packages from the command line. It is
recommended to upload packages here if we want our projects to reach a
wider audience.

To begin, you will need to create an account on PyPI and its sister-site, TestPyPI – the latter is used to check that our packages have been uploaded and set up properly before committing to the standard repository.
To help people find our project after it’s uploaded, we should add
some keywords they can search for. We can also add ‘classifiers’ that
categorise our project and describe its intended audience. A list of
possible classifiers are available on the PyPI website. These should be
added to our pyproject.toml:
TOML
# file: pyproject.toml

[project]

# keywords should contain search terms so users can
# find our project
keywords = [
    "epimediology",
    "virology",
    "SIR",
    "SEIR",
    "Compartmental",
    "Model",
]

# Classifiers are a standard set of categories for
# our project, including which level of development
# we're at, who our intended audience is, which
# license we're using, etc.
classifiers = [
    "Development Status :: 3 - Alpha",
    "Programming Language :: Python :: 3",
    "Intended Audience :: Science/Research",
    "Topic :: Scientific/Engineering :: Bio-Informatics",
    "License :: OSI Approved :: MIT License",
]
Before discussing how to get our project hosted on PyPI, we’ll quickly discuss ‘wheel’ files, which are the standard way for Python to distribute packages.
Wheel files
When we install packages using pip, it first creates a
‘wheel’ file, with the file extension .whl. For
example:
... installs dependencies ...

Building wheels for collected packages: epi-models
  Building wheel for epi-models (pyproject.toml) ... done
  Created wheel for epi-models: filename=epi_models-0.1.0-py3-none-any.whl size=5378 sha256=005bcad72e7f6cc773f4180960e402e3bdbdf0fcb6fb683a019d9521775edfc8
  Stored in directory: /tmp/pip-ephem-wheel-cache-69r0h48p/wheels/d9/4d/ac/bbc1437fd83635787dd0fb8c3df8da61fc7b57f6eaa2b0d17b
Successfully built epi-models
Installing collected packages: epi-models
Successfully installed epi-models-0.1.0
The installation goes through several steps:
-
pipanalyses our package and creates a.whlfile. - The
.whlfile is stored in a temporary directory. - The package is installed to our system from the
.whlfile.
After installation, we can find our installed package at
/path/to/my/env/lib/python3.8/site-packages/epi_models, and
within we’ll find that every file has been compiled to Python bytecode,
contained within __pycache__ directories. So what is a
wheel file, and how does it help with this process?
A wheel is a standard package distribution format, defined in PEP 427. It is essentially
a .zip file with a descriptive name that contains our
package. When we installed our package above it created the following
wheel file:
epi_models-0.1.0-py3-none-any.whlThe filename has seveal components separated by dashes. In order, these are:
- The package name
- The package version
- Language implementation, such as
py3,py27, orpy2. Packages that are compatible with any Python version will bepy2.py3. Packages that are only compatible with a particular Python implementation, such as CPython, may be listedcpy38. - The ABI tag, which stands for ‘Application Binary Interface’. This
specifies the binary compatibility of the CPython API, and may take a
value such as
abi3. This won’t be relevant unless you’re distributing compiled extensions written in C, and will benoneif your package is pure Python. This is beyond the scope of these lessons. - Platform tag, which specifies which operating system your package is
compatible with.
anymeans it will run on Windows, Mac or Linux, while it may say something likemacosx_10_9_x86_64if it includes compiled C extensions for Mac OSX 10.9 on an x86_64 architecture. Themanylinuxtag encompasses many different popular Linux distros.
When we upload our package to PyPI, we will do so in the form of a
wheel file, which contains all Python files in our package along with
any compiled binaries for extensions written in C. When a wheel file is
installed, Python files are compiled to bytecode, and the package is
installed to the site-packages of our environment.
As the wheel file contains compatibility information in its name,
pip can quickly check to see whether any wheels uploaded to
PyPI are compatible with our system whenever we try to install
something. In order to meet the needs of as many users as possible, it’s
also possible for us to upload multiple wheels for each release – one
for each targeted Python version and operating system.
hatch build
So how do we create a wheel file to upload? The Hatch library can be used to build and publish wheels.
As we already have a pyproject.toml, build
has everything it needs to create a wheel file. It can be called simply
using:
This will create a new directory ./dist containing the
following:
 📁 dist
 |
 |____📜
epi_models-0.1.0-py3-none-any.whl
 |____📜
epi_models-0.1.0.tar.gz
We can see the contents of the .whl file by unzipping
it:
We’ll see that it contains our package along with a second directory
epi_models-0.1.0.dist-info, which contains package metadata
such as our license and README file. Note that we should remove the
unzipped directories from ./dist before the upload
stage.
The second file hatch build created is a
.tar.gz file – a gzip-compressed tarball. This is a ‘source
distribution’, which is used as a backup by pip if it can’t
find a suitable wheel file to install.
Publish Wheels to test-pypi
The tool for uploading our package to PyPI is
hatch publish.
Note: before we upload our package we will need to make sure we are using unique package names.
Change you package name from to
githubusername-epi_modules.
You will need to change the package name in the following locations:
- pyproject.toml - project.name - project.scripts entrypoint - The
src/epi_models dir - Any relative imports in the
modules
Test that the package can still be installed.
Lets commit those changes and add a new tag.
BASH
# list tags
git tag

# Add new tag
git tag -a 0.1.1 -m "Edit package name"

# Push the tag to github
git push origin 0.1.1

# list tags
git tag
We can test the distribution of our package by uploading to TestPyPI.
First we will need to create a “token” on test-pypi to use as a temporary password.
To avoid entering you token on the cmd line you can provide details as env variables
For more authentication options see the Hatch documentation.
Note that there is a registration process for TestPyPI, and a separate one for PyPI.
Once uploaded to TestPyPI we can check that everything looks correct using the web interface.
If you choose to pip download from TestPyPI you may need
to specify that the dependencies are gotten from PyPI proper by using
the --extra-indec-url flag. This is because the
dependencies may not be available through TestPyPI.
BASH
$. pip install -i https://test.pypi.org/pypi/ --extra-index-url https://pypi.org/simple githubusername-epi_models==0.1.0The process is the same for publishing to PyPi (but please don’t publish this test project!).
Users will then be able to install our package to any machine by calling the following:
Similarly, it can be included as a dependency to other Python projects:
As we continue to develop our software, we should upload each new version to PyPI. Our users will then be able to request a particular version:
Extra: Automating Package Publishing with GitHub Actions
We saw earlier how to ensure that the version of our package was stored only in the Git tags. We can similarly set up our GitHub project to automatically publish our package whenever we make a new release. We can use GitHub Actions for this, which is a service used for continuous integration. It can achieve tasks such as:
- Automatically run tests on a variety of platforms each time a new commit is pushed or version is published.
- Enforce a code style automatically.
- Publish work on each release.
GitHub Actions are controlled using a YAML file. Though the full specification is beyond the scope of this course, the following file will cause GitHub to automatically upload our package to PyPI with each new release:
YAML
# Provide a name for the workflow
name: Upload Python Package

# Tell GitHub when to run the action
# This will run every time a new release is published
on:
  release:
    types: [published]

jobs:
  deploy:
    # Run the workflow on the latest Ubuntu version
    runs-on: ubuntu-latest
    steps:
      # This will checkout our GitHub project and enter
      # the directory
      - uses: actions/checkout@v3
      # This will set up a Python environment
      - name: Set up Python
        uses: actions/setup-python@v4
        with:
          python-version: '3.x'
      # Here we update pip to the latest version and
      # install 'hatch'
      - name: Install dependencies
        run: |
          python -m pip install --upgrade pip
          pip install hatch
      # Here we run build to create a wheel and a
      # .tar.gz source distribution.
      - name: Build package
        run: hatch build
      # Finally, we use a pre-defined action to publish
      # our package
      - name: Publish package
        uses: pypa/gh-action-pypi-publish@release/v1
        with:
          user: __token__
          password: ${{ secrets.PYPI_API_TOKEN }}
This should be included in the file
.github/workflows/publish.yml, where the
.github directory is located at the top level of our
project (at the same level as pyproject.toml). In order for
this to work, we’ll need to set up a PYPI_DEPLOYMENT_TOKEN
in the ‘secrets’ section of our project’s GitHub settings. A guide to
doing this may be found on the PyPI website.
You should never push sensitive information such as passwords directly to your GitHub projects!
With this set up, our projects will be automatically pushed to PyPI each time we make a new release.
- Versioning our projects is important so that our users know what’s compatible.
- GitHub is a powerful service for hosting our projects and managing their development.
- Each new release of our packages should be uploaded to PyPI using
hatch buildandhatch publish.